Unannounced Project
Performance Optimization and Profiling, Lighting Design, Material and Shader Creation and Implementation, Environment Design, Blueprint Creation and Gameplay Mechanics, Animation Implementation, Still Virtual Photography
Interactive Gameplay
Cinematic Video
This project was a really fun challenge in optimization. We were being asked to deliver an extremely complex space with multiple moving parts, and it all needed to be run in real-time on a mid-level computer that projected to a giant 32:9 screen. So getting this project as optimal as possible was extremely important to making things run smoothly. I ended up using several tricks to help performance.
The easiest change was getting rid of all fog systems and replacing them with billboards. I also set up level streaming to help, since that allowed only visible areas to be loaded into memory. However, the theater was still very heavy, since it needed the theater space, projector room, and lobby/underwater area to all be loaded at the same time. To help this, I replaced the window to the projector room with a one-way still image. Since you were so far away when you looked into the projector room from the theater, the shift in perspective was only noticeable if you were looking for it. But when viewing the theater from the projector room, since the still image was one-sided, you looked out the window like normal.
We also ran into some optimization issues in the lobby. Since there were so many lights on the walls, we were seeing a huge performance drop. However, we still wanted to keep the textures the lights were creating. At this point we were using Lumen for lighting, but these lights proved to be an issue with light baking as well, since it required the lobby walls to have such a high lightmap resolution. To get around this hiccup, I masked out the light pattern in photoshop and turned it into a decal. This way, we could fake the lighting (almost as if we were baking it) and get the lighting details without worrying about performance.


Custom Shaders
We ran into a lot of trouble when working on the theater space. We were told to make the walls change textures, from a theater space to an ocean full of swimming fish, and for the changing textures to appear as rings spreading from a single point at the center of the stage. As you can imagine, this imposed a whole slew of challenges. We needed a ring texture to expand across the physical space despite the walls not being UV mapped and textured with that in mind. We needed to control a material change starting at a point in the physical space- a location that could change. And we needed to fill the walls with moving fish without absolutely demolishing performance. Oh, and they also wanted moving dancers on stage in front of all of this. Quite a challenge.
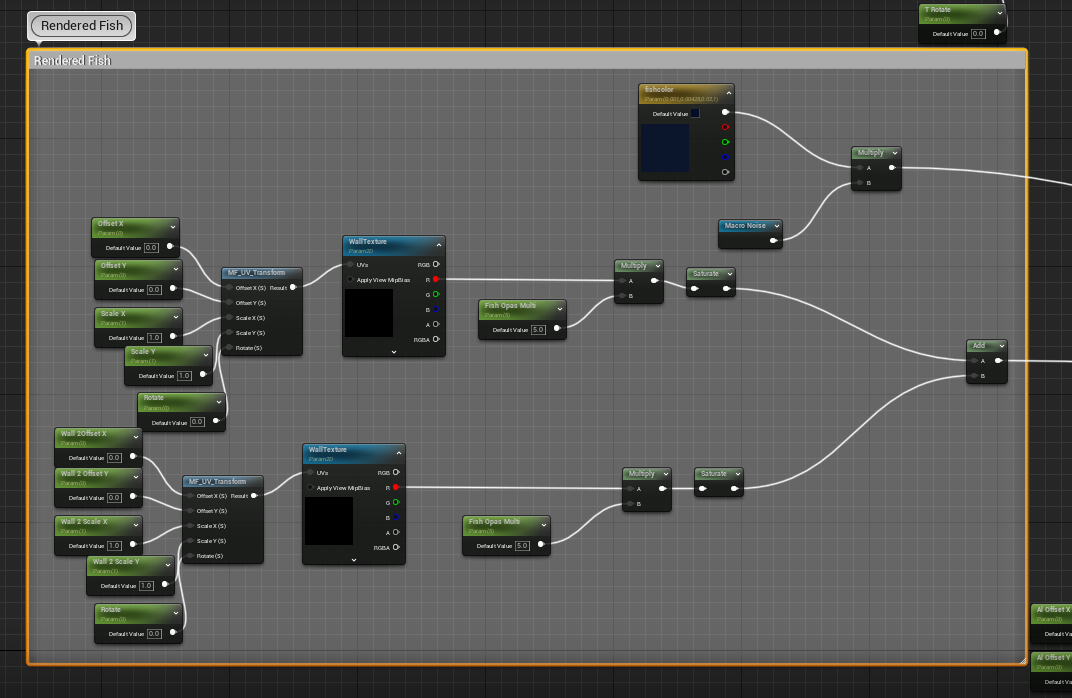
Since we knew adding videos would be way too heavy on the memory, Kristina had the idea of setting up render target cameras pointed at an underwater scene, with particle systems of fish in front of it. This actually worked out really well! But any benefit we gained from not using videos, we lost with using so many render target cameras (one per wall) and a skeletal mesh particle system.
Since this idea worked so well, I wanted to keep it, and I went to work on figuring out just how much optimization I could get away with. I turned the skeletal mesh animations into flipbook animations, then used the particle systems to render sprites instead. Then I removed the underwater environment. I allowed the render cameras to only render the fish, then composited the fish over top a static image in the material.
Since that was still not enough optimization, I then removed all except one render target camera, pointed at a single particle system. Then, I set up a system in the material that allowed these fish to be overlayed twice per wall, at different positions and scales. This way, a single rendered school of fish turned into 8 schools of fish with very little hit to performance. I also changed the render target camera to update 3 times per second instead of on every event tick. While this still made performance drop slightly, during those ticks, it was much more manageable than a consistently mediocre FPS. This system worked out very well! Performance was good to go.
Now, I just had to figure out how to get those textures to change with a very specific mask. I ended up following Steve Biegun’s tutorial on Material Parameter Collections on YouTube, and went with a system similar to what he uses. I created a material parameter that takes a location within the world space and creates a sphere mask based on that starting point. Then, the mask expands with a Frac node (so it only expands in one direction). After that, it was just a matter of adding in additional sphere masks at different percentage points of the original- to either subtract from the original mask or add back into it.
Then, all of these elements were combined to make the final shader.


In-Game Stills


